If you have not made a decision yet to purchase our product or have any doubts concerning its possibilities or compatibility with your software or hardware we give you a chance to download ASTER and test it right now!
The software will work without any limitations for 14 days, after which you will have to buy and activate it.
Before installing the software it is highly recommended that you read the User’s Manual for the corresponding version of ASTER.
Important: Read User Guide and End User License Agreement (EULA) first!
Important:
- This version of the software works only in Windows 7 SP1 or newer versions! In order to run the program in Windows 7 SP1 you should have Windows update KB3033929.
ASTER Licensing
- License keys from ASTER V7х2х32/64 and ASTER V7х6х32/64 are not suitable for ASTER v2.xx.
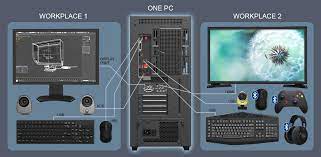
ASTER — program (and only a program!), which allows you to create several workplaces on the basis of one system unit.
ASTER is a software solution that does not use thin clients or terminal stations.
For adding additional workplaces to the system, it is enough to connect an additional monitor (TV), a keyboard, and a mouse. If necessary, each workplace can be connected to separate audio input/output devices as well as gaming controllers (joysticks). IT is also possible to use external monitors (preferably DisplayLink monitors) via USB or WIFI/LAN connections.
After installing and launching, ASTER will provide each user with their own independent desktop. ASTER is versatile and can be used in various areas – from office computers to gaming systems, while significantly saving on the cost of hardware and software for each workplace. The figure below shows an example and schematics of how ASTER works.
Testing is necessary in order to find an unforeseen error in the operation of your software and the compatibility of hardware. For this, there is a trial period (14 days)(See. Trial Period ) of ASTER which you can try out and decide whether to purchase an ASTER license or not.
ASTER Installation
Installing ASTER program:
1. Download the ASTER installation package from downloads the download page.
When you start the installation, it is recommended that you create a system restore point (Check the “Create a restore point” checkbox in the installation wizard.) – in case of problems, you will be able to restore your system to its original state:

2. Read the program description and then accept the terms and conditions for the user license agreement of ASTER:


3. Select your desired installation directory, and optionally set power and OS boot parameters recommended for running ASTER properly (selected by default):

Settings – «Optimize power-saving parameters»
- Sets the power option to high performance;
- Disables monitors sleep state and hibernation;
- Disables power down on USB devices.
Settings – «Disable Fast Boot».
The «Fast Boot» mode speeds up the loading of the OS, but can cause the problem in running ASTER and additional seats. Then check box is disabled if Fast Boot is already disabled or you are installing ASTER in Windows 7. These parameters can be changed if required after completing the installation of ASTER.
Settings – «Install Screen Saver(PowerSaver)»
Sets the screensaver PowerSaver.scr, which can be enabled in the personalization settings. This is an alternative to the use of energy-saving modes, which often work incorrectly with ASTER.
4. Once ASTER installation is completed, you need to restart the computer once.

Once you have restarted, you can see 3 shortcuts added under ASTER folder in Start/Programs menu.
- ASTER Control Panel – this shortcut will open the ASTER Control Panel, when you will configure, enable or disable ASTER program.
- ASTER User’s Manual – this shortcut will open the ASTER user manual to refer to configuring ASTER.
- EULA (End User License Agreement) – is the user’s license agreement.
These three shortcuts may not be shown in the Recently Used section in Start Menu, but they can always be found in the “All Programs” section.
Any changes can be made only after your reboot ASTER after installation is completed.
Setting up ASTER
Preparing to setup ASTER
To successfully start additional workstations, you must first configure the system: assign a monitor, keyboard, mouse and, if necessary, a sound device to each workplace.
Before proceeding with the setup of ASTER, remember the following important information:
- Most of the changes in the ASTER settings are stored in the program memory (temporarily) and will not be written to disk until you click the “Apply” button.
- Some settings changes take effect only after the computer restarts. The indication of this is the appearance of the “Restart System” button in the lower-left corner of the program window.
- When you close ASTER, a reminder window pops up and asks if you want to save the changes and, if necessary, restart the system.
- ASTER starts automatically when the first (main) workplace logs on to the windows and reaches Desktop if the workstations are not already configured. Otherwise, it will be minimized to the system tray (notification area).
- When you close the ASTER window on the first workplace, the program does not exist. It will minimize the system tray. To exit the program, click the “Exit” or “Finish” button from the context menu of the program icon in the system tray.
After starting the program, a window opens in which the ASTER is configured. Controls like icons, buttons, lists, etc. are provided with hints in the style of “What is it?”. You can call this prompt in the following ways, in case there is any doubt about the purpose of this or that element:
- Press Shift and F1 keys on the keyboard simultaneously (the simplest option);
- Open the context menu (right mouse click) and select the “What is it?” option;
- If the title of the window contains the “?” icon, click on this icon, and then on the required element.
